Changing a flat tire is a valuable skill. It can save you time and money.
Imagine you’re on a quiet road, far from help, and your tire goes flat. What do you do? Knowing how to change a flat tire can turn a frustrating situation into a manageable task. This skill gives you the confidence to handle unexpected car troubles.
In this guide, we’ll walk you through the simple steps to change a flat tire. You’ll learn about the tools needed and the safety measures to take. By the end, you’ll be ready to tackle a flat tire with ease. Let’s get started and empower you with this essential car maintenance skill.
Preparation Before You Start
Gather necessary tools and check your vehicle’s manual. Ensure you have a spare tire, jack, and lug wrench.
Changing a flat tire can be a daunting task, especially if you’ve never done it before. But with the right preparation, it can be straightforward and manageable. Before you dive into the process, it’s crucial to be prepared. Here’s how you can set yourself up for success.
###
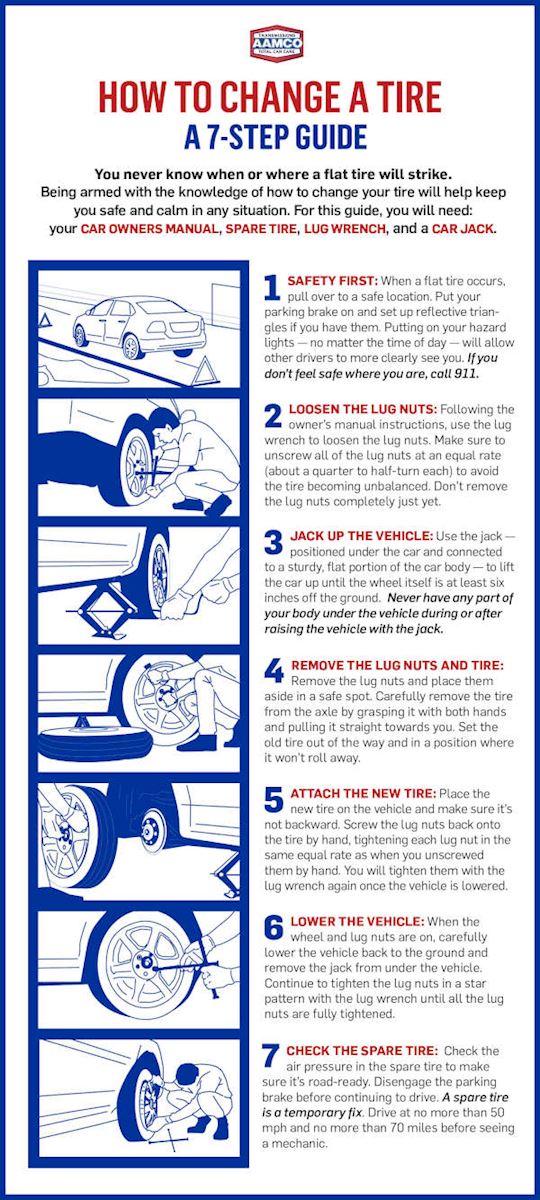
Safety First
Your safety is paramount. Always start by ensuring your car is parked on a flat, stable surface away from traffic. Use your hazard lights to alert other drivers.
If you’re on a busy road, consider using reflective triangles or flares to increase visibility. This simple step can prevent accidents and keep you safe.
Never change a tire on an incline. The car could roll, causing severe injury. Always use the emergency brake for extra security.
###
Gather Necessary Tools
Before starting, gather all the tools you’ll need. You should have a spare tire, jack, lug wrench, and possibly a tire pressure gauge.
Check your car’s manual for the exact tools and their locations. Often, they are stored in the trunk or under a panel.
Having these tools in an easily accessible place saves time and reduces stress. Make sure you know how to use each tool. Practice at home in a controlled environment. It’s better to be prepared than to struggle during an emergency.
###
Personal Story For Engagement
I remember my first flat tire experience. I was on a remote road with no cell signal. Luckily, I had all my tools and had practiced changing a tire in my driveway. That preparation saved me hours of frustration and got me back on the road quickly.
Are you prepared for a flat tire? Taking a few simple steps now can make a world of difference when you need it most.
Finding A Safe Location
Changing a flat tire can be stressful. Finding a safe location is crucial for your safety and the safety of others. You need a spot where you can pull over safely and not obstruct traffic.
Pull Over Safely
When you realize you have a flat tire, don’t panic. Slow down gradually. Look for a safe place to stop. An empty parking lot or a wide shoulder is ideal. Avoid stopping on curves or near heavy traffic.
Once you find a safe location, pull over smoothly. Ensure your vehicle is off the road and away from traffic. This will protect you and others while you change the tire.
Use Hazard Lights
Once you pull over, turn on your hazard lights. These lights will alert other drivers. They will know your vehicle is stationary. This helps prevent accidents and keeps you safe.
If you have reflective triangles or cones, place them around your vehicle. This adds another layer of safety. Other drivers will see these and steer clear.
Loosening The Lug Nuts
Changing a flat tire can seem daunting. One crucial step is loosening the lug nuts. Properly loosening the lug nuts ensures the tire can be removed safely and efficiently. Follow these steps to get it right.
Use The Lug Wrench
First, find the lug wrench in your car’s toolkit. It looks like a cross or an L-shaped metal tool. Place the lug wrench onto a lug nut. Ensure it fits snugly. A loose fit can strip the nut. Always use the correct size to avoid damage.
Turn Counterclockwise
Grip the lug wrench firmly. Apply steady pressure to turn it counterclockwise. Sometimes, the lug nuts are very tight. Use your body weight if necessary. Stand on the wrench handle if needed. Ensure you do not loosen them too much. Only a quarter turn is enough.

Credit: www.aamcoblog.com
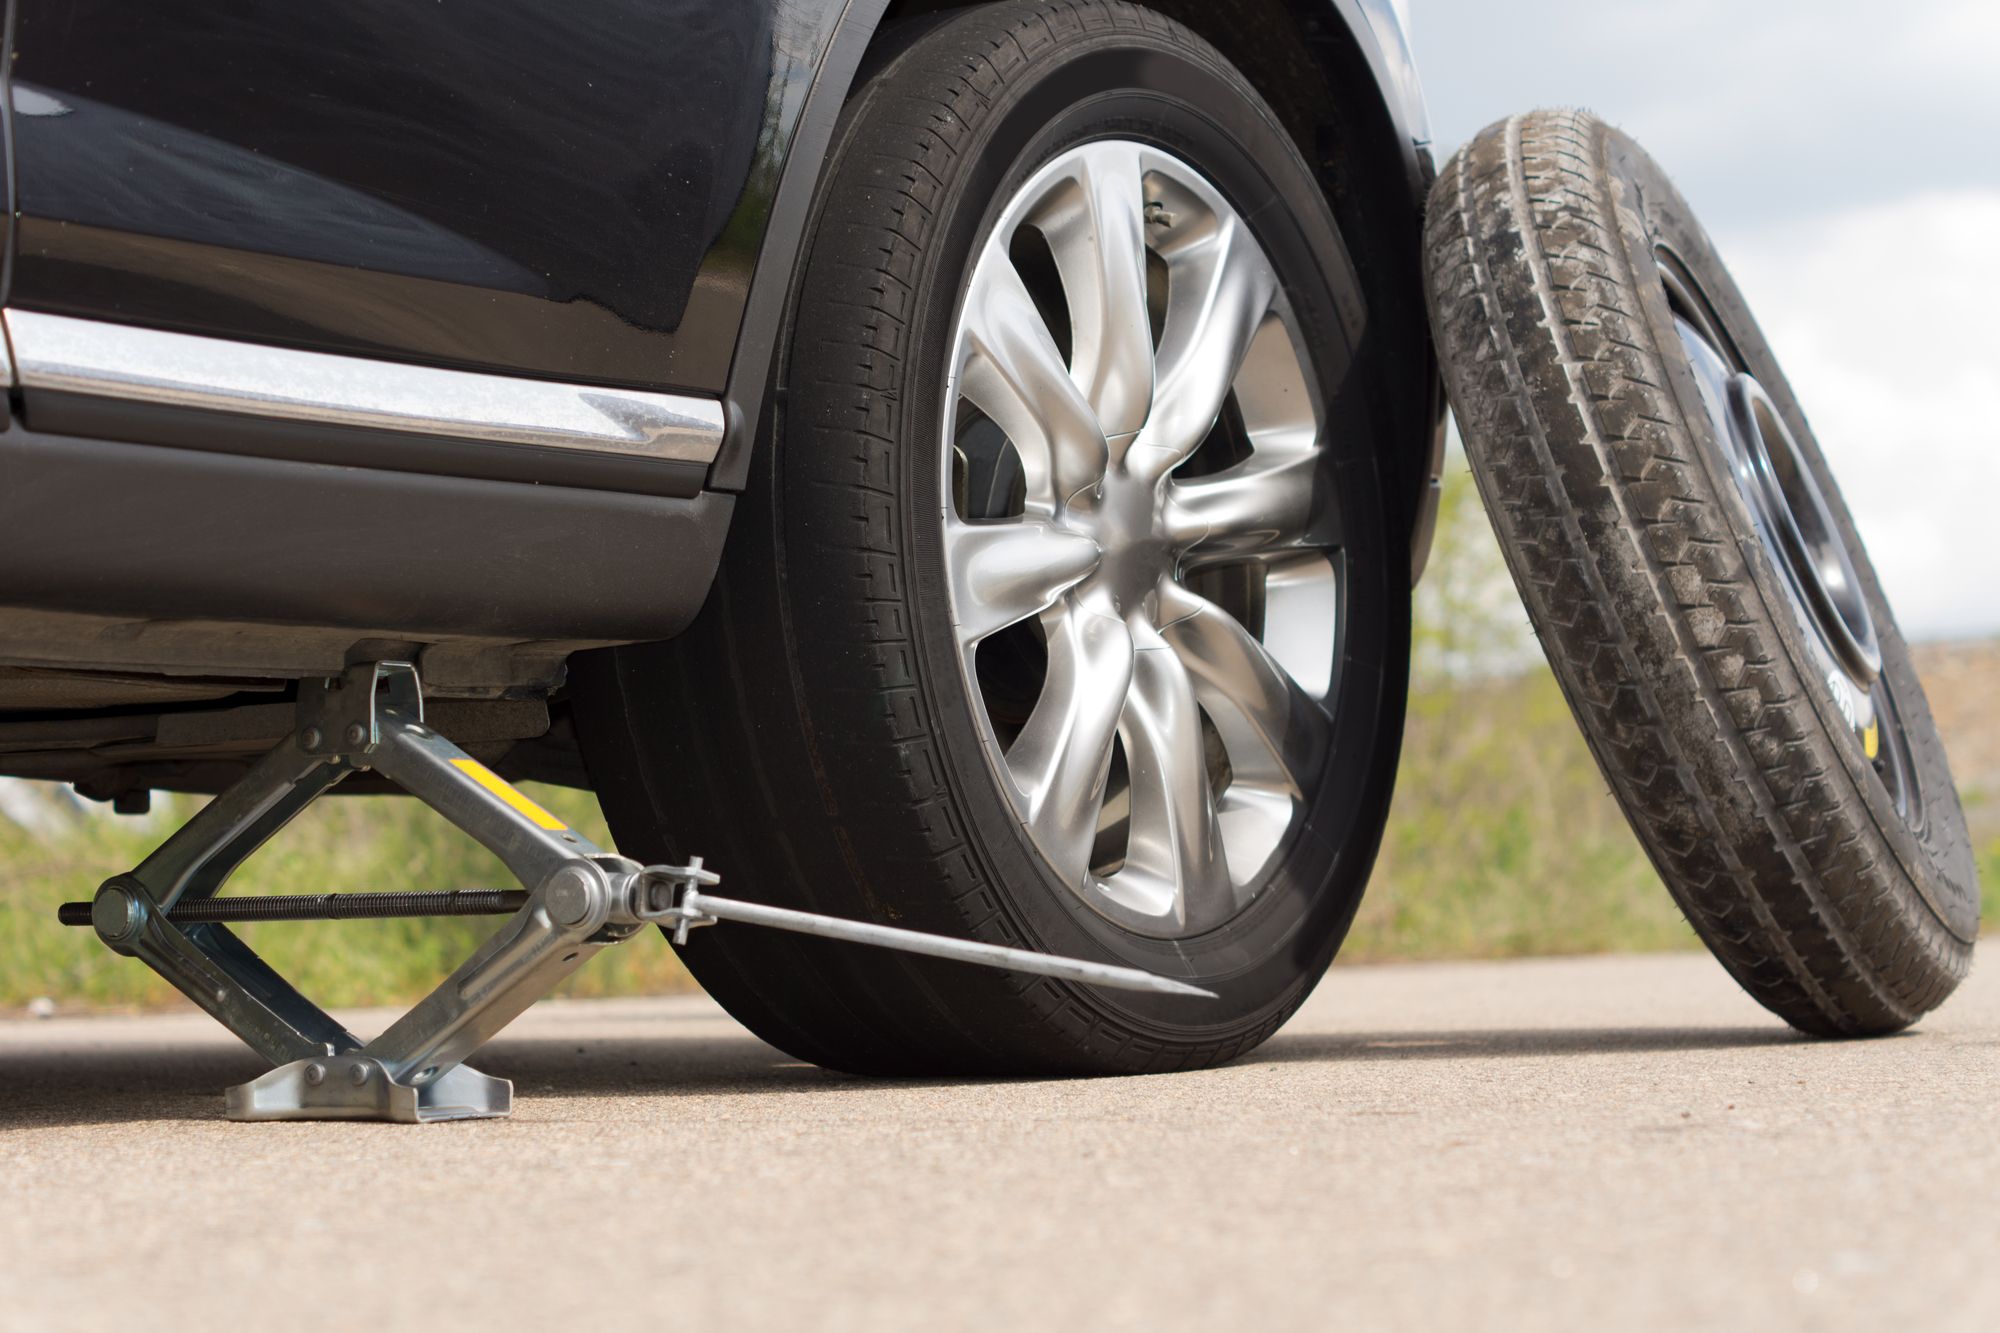
Lifting The Vehicle
Lift the vehicle using a jack to access the flat tire. Place it under the car’s frame near the tire.
Changing a flat tire can be a daunting task. But lifting the vehicle is one of the most critical steps. This section will guide you through it. Let’s dive into the details.
Position The Jack
First, find a solid, level surface. Avoid soft ground or hills. Locate your car’s jack point. It’s usually under the frame near the flat tire. Check your car manual if unsure. Place the jack under this point. Ensure it’s secure and straight.
Raise The Car
Now, it’s time to lift the car. Turn the jack handle clockwise. Do this slowly and steadily. Keep an eye on the vehicle. It should rise evenly. Lift the car until the flat tire is about six inches off the ground. Make sure it feels stable. Safety is key.
“`
Removing The Flat Tire
Change a flat tire by loosening the lug nuts and lifting the car with a jack. Remove the flat tire and replace it with the spare. Ensure all lug nuts are tightened before lowering the car.
Changing a flat tire can seem daunting, but breaking it down into simple steps makes it manageable. One of the most critical steps is removing the flat tire itself. Once your car is safely lifted and secured, it’s time to get the flat tire off. This part of the process requires some strength and patience, but with the right approach, you can handle it like a pro.
###
Take Off The Lug Nuts
First, you need to remove the lug nuts. These are the bolts that hold your tire in place. Use a lug wrench to loosen them. Turn them counterclockwise.
Make sure to loosen them slightly before you lift the car off the ground. This prevents the tire from spinning while you try to turn the wrench. You might need to apply some force, but be careful not to strip the nuts.
Once your car is lifted, completely remove the lug nuts. Keep them in a safe place. You don’t want them rolling away. Remember the order in which you removed them. This will help when you put the new tire on.
###
Pull Off The Tire
With the lug nuts removed, you can now take off the flat tire. Grip the tire firmly with both hands. Pull it straight towards you.
If the tire feels stuck, try giving it a gentle kick at the edges. Sometimes, tires can get a bit rusty or stick due to dirt. Don’t worry, this is common.
Once the tire is off, set it aside. Now, you have a clear view of the wheel hub. This is a great moment to check for any debris or damage. A clean and intact wheel hub ensures your new tire will fit perfectly.
Removing a flat tire can feel like a workout, but it’s all part of the process. Have you ever had to deal with a particularly stubborn tire? Share your experience in the comments and let’s help each other out!
Installing The Spare Tire
Changing a flat tire involves lifting the car with a jack. Next, remove the flat tire. Finally, install the spare tire by aligning and tightening the bolts.
### Installing the Spare Tire
Changing a flat tire can feel like a daunting task, but installing the spare is often where the magic happens. You’ve done the hard work of removing the flat, and now it’s time to get your vehicle back on the road. Let’s walk through the steps of aligning and tightening your spare tire to ensure a smooth ride.
### Align the Spare
First, grab your spare tire and align it with the wheel bolts. Make sure the holes in the spare match up perfectly with the bolts on your car.
You may need to wiggle the tire a bit to get it in place. This step is crucial because any misalignment can cause issues later.
Remember, patience is key here. If you rush, you might miss aligning it correctly.
### Tighten the Lug Nuts
Once the spare is aligned, start by hand-tightening the lug nuts.
Turn each nut a few times to ensure they are threaded correctly before using the lug wrench. Hand-tightening prevents cross-threading, which can damage the bolts.
After hand-tightening, use the lug wrench to tighten the nuts in a star pattern. Tighten one nut, then move to the one directly across from it.
This ensures the wheel sits evenly on the hub. Tighten each nut gradually, giving each one a few turns before moving to the next.
By the time you finish, all the nuts should be equally tight.
Do you remember the last time you had a minor inconvenience because of a flat tire? It’s the little steps like these that can save you from being stranded.
Take a moment to double-check each lug nut for tightness. A loose nut can lead to wobbles or, worse, your tire coming off while driving.
How confident are you that the nuts are tight enough? If in doubt, give each one a final check.
By carefully aligning and tightening your spare tire, you’re ensuring a safe journey ahead.
Lowering The Vehicle
Lower the vehicle slowly after replacing the flat tire. Ensure the new tire touches the ground evenly. Remove the jack carefully.
Changing a flat tire is a skill every driver should have. After you’ve safely jacked up your car and replaced the flat tire, the next step is just as crucial: lowering the vehicle. This step ensures that the car is stable and safe to drive. Let’s break down the process.
Lower The Car
Once the new tire is securely in place, it’s time to carefully lower your car. First, make sure everyone is clear of the vehicle. Slowly turn the jack handle counterclockwise to bring the car down.
Take your time. Rushing can cause the car to drop suddenly, which can damage the car or even cause injury.
As the car touches the ground, the weight will start to shift back onto the tire. Make sure the car is fully grounded before removing the jack completely.
Remove The Jack
After the car is safely on the ground, it’s time to remove the jack. Before you do, double-check that the car is stable and not wobbling.
Carefully slide the jack out from under the car. Store it in your trunk, so it’s ready for the next time you need it.
Taking these steps helps ensure that your car is safe to drive. Have you ever been in a situation where you thought you were done, only to realize you missed a step? It’s always better to double-check than to risk driving unsafely.
Lowering the vehicle is simple but vital. Always prioritize safety. Now, you’re ready to get back on the road with confidence!
Credit: www.aamcoblog.com
Final Checks
Check tire pressure and ensure all tools are stored securely. Confirm the spare tire is properly installed. Clean up any debris from the work area.
Changing a flat tire can feel like a daunting task, but with the right steps, you can be back on the road in no time. Once you’ve successfully swapped out your flat tire, it’s crucial to perform some final checks to ensure everything is secure. These final checks are simple yet vital in preventing any mishaps later. Let’s dive into the last steps you need to take.
Tighten The Lug Nuts Again
After lowering your vehicle back to the ground, it’s time to give the lug nuts another go. While the car was elevated, you could only tighten them so much.
Now that the car’s weight is on the tire, use your lug wrench to tighten each nut as much as possible. This ensures they are secure and won’t loosen while driving.
Start with one lug nut and tighten it, then move to the one directly opposite. This crisscross pattern ensures even pressure on the wheel.
Stow Your Equipment
Don’t forget to put everything back in its place. Gather your jack, lug wrench, and the flat tire. Place them securely in your trunk or storage compartment.
Check that your equipment is neatly stowed away and won’t move around while driving. You don’t want any loose tools causing damage or noise.
Take a moment to clean your hands and any tools you used. It’s always nice to have clean tools ready for the next time you need them.
Have you ever had a flat tire in the rain or on a busy road? It’s even more important to quickly and safely store your tools, so you’re prepared for any situation.
By following these final checks, you ensure your tire change is complete and your vehicle is ready to go. You can drive with confidence, knowing you’ve done everything to keep yourself and your passengers safe.
Credit: wrench.com
Frequently Asked Questions
How Do You Change A Flat Tire Yourself?
To change a flat tire, park on a flat surface. Loosen the lug nuts. Lift the car using a jack. Remove the flat tire and replace it with the spare. Tighten the lug nuts and lower the car. Check lug nuts again for tightness.
How Do You Change A Flat Tire In 5 Steps?
To change a flat tire in 5 steps: 1. Loosen the lug nuts. 2. Jack up the car. 3. Remove the flat tire. 4. Mount the spare tire. 5. Tighten the lug nuts securely.
How To Remove A Stuck Flat Tire?
Loosen the lug nuts and lift the car with a jack. Hit the tire with a rubber mallet. Rotate and pull the tire off. Apply penetrating oil if needed.
What To Do When Tire Is Completely Flat?
Stop the vehicle safely. Use hazard lights. Locate the spare tire and tools. Loosen lug nuts, jack up the car, replace the tire, and tighten the nuts. Drive to a repair shop for a proper fix.
Conclusion
Changing a flat tire is a useful skill. It saves time and money. Keep a spare tire, jack, and wrench in your car. Remember safety first. Practice makes it easier. Follow steps closely for success. Check tire pressure regularly. It’s smart to stay prepared.
Share this guide with friends. They might need it too. Happy driving and stay safe!
4 Responses